This is my mother-in-law's Christmas Cookie Cookbook.
Tuesday, March 3, 2026
Monday, September 22, 2025

Saturday, August 26, 2023
Catholic Bible Word Search
Available now on Amazon is my Catholic Bible Large Print Word Search which features:
- 84 Word Searches

- Many Puzzle Shapes
- Answers
- 18pt font size
- Large Print
Wednesday, March 8, 2023
Read Catholic Bible in a Year
Now available on Amazon is the "Read the Catholic Bible in a Year" journal/planner paperback.

- Reading from the Old Testament
- Reading from one of these: Psalms, Job, Proverbs, Ecclesiastes, Song, Wisdom, Sirach
- Reading from the New Testament
You don’t have to start on January 1st , you can begin on any day as the days are numbered 1 thru 365. The day number is located in the outer margin on each page.
Please note you will need a copy of the Catholic Bible as the text is not included with this journal. Here are some options for the Bible text:
- My iOS app “Catholic New American Bible RE” offers the text along with the same read bible in a year plan.
- My New American Bible Revised Edition eBook is available on:
- My "Bible for Catholics" iOS app -- This is the Catholic Public Domain Version (CPDV) of the Holy Bible. It is not the New American Bible(NAB) and thus some parts will be slightly different than the NAB.
Below are some snapshots from inside the journal paperback:
 | ||
Left side
|

 |
| Bible Books |
Wednesday, November 16, 2022
My Catholic Bible Apps
These are my Bible apps and ebooks:
- New American Bible Revised Edition (NABRE) Bible -- These have been approved by the United States Conference of Catholic Bishops (USCCB) and is the current version of the Catholic Bible. It is available for these devices:
- Bible for Catholics -- This is the Catholic Public Domain Version (CPDV) of the Holy Bible. It is not the New American Bible(NAB) and thus some parts will be slightly different than the NAB.
- All-In-1 -- This iPhone includes: NABRE Bible, Catholic Prayers, Liturgical Calendar, Local Catholic Places, Order of the Mass, ...
Thursday, August 18, 2022
Database Links using Autonomous Database with private endpoints across regions
I am using Autonomous Databases 19c shared infrastructure(ADB-S) with the source in Phoenix and the target in London.
Prereqs include:
- Two ADB-S with private endpoints , one in each region
- Region peering configured
- DNS configured -- I like to create a compute VM in each region and verify region peering and DNS is working
Once the above is completed follow the next steps to create the db links.
- Upload the target database wallet to object storage
- Create the directory in the database to hold the wallet in the source database
- Create the credential to access object storage in the source database
- Copy the wallet from object storage to the source database
- Create another credential to access target database in the source database
- Create the database link
References:
Example:
Run the following commands on the source database:
create directory wallet_dir_london as 'WALLETDIR_LONDON';
begin
DBMS_CLOUD.create_credential (
credential_name => 'OBJ_STORE_CREDA',
username => 'YOUROCIUSERNAME',
password => 'YOURTOKEN
) ;
end;
/
begin DBMS_CLOUD.GET_OBJECT(
credential_name => 'OBJ_STORE_CREDA',
object_uri => 'https://objectstorage.us-phoenix-1.oraclecloud.com/n/YOURTENANCY/b/gfswinglondon/o/cwallet.sso',
directory_name => 'WALLET_DIR_LONDON');
END;
/
SELECT * FROM DBMS_CLOUD.LIST_FILES('WALLET_DIR_LONDON');
BEGIN
DBMS_CLOUD.CREATE_CREDENTIAL(
credential_name => 'DB_LINK_CRED',
username => 'ADMIN',
password => 'YOURADBPASSWORD');
END;
/
SELECT owner, credential_name FROM dba_credentials
BEGIN
DBMS_CLOUD_ADMIN.CREATE_DATABASE_LINK(
db_link_name => 'LONDONDBLINK',
hostname => '*********.adb.uk-london-1.oraclecloud.com', (your hostname here)
port => '1522',
service_name => '**************_gfswinglon_high.adb.oraclecloud.com', (your service name here)
ssl_server_cert_dn => 'CN=adwc.eucom-central-1.oraclecloud.com, OU=Oracle BMCS FRANKFURT, O=Oracle Corporation, L=Redwood City, ST=California, C=US',
credential_name => 'DB_LINK_CRED',
directory_name => 'WALLET_DIR_LONDON',
private_target => TRUE);
END;
/
select ora_database_name@londondblink from dual;
Thursday, August 11, 2022
Using ADB wallet to hide your sqlplus and sqlldr password
Using the following:
- Autonomous Database (ADB) 19c
- Oracle database client 21c on an OCI VM running OL 8
Here are the steps:
- Download the ADB wallet from the OCI console and unzip to a empty directory
- Modify the sqlnet.ora file
- Add the following line “SQLNET.WALLET_OVERRIDE=TRUE”
- Modify the WALLET_LOCATION line, change DIRECTORY="?/network/admin” to point to your new unzip directory. , i.e. DIRECTORY="/home/oracle/Wallet_gfships”
- create a credential to the Wallet for your db user.
- mkstore -wrl /home/oracle/Wallet_gfships -createCredential gfships_high admin youradminpassword (Or use your db user account) this command will ask for the wallet password which is the same password you used to download the wallet from the OCI console.
- set TNS_ADMIN to this wallet directory
- verify connectivity with tnsping
Below are examples using SQLPLUS and SQLLDR with and without the password
SQLPLUS Example:
[oracle@linux-jump-server ~]$ sqlplus admin/yourpassword@gfships_high
SQL*Plus: Release 21.0.0.0.0 - Production on Mon Aug 1 02:23:36 2022
Version 21.3.0.0.0
Copyright (c) 1982, 2021, Oracle. All rights reserved.
Last Successful login time: Mon Aug 01 2022 02:21:59 +00:00
Connected to:
Oracle Database 19c Enterprise Edition Release 19.0.0.0.0 - Production
Version 19.16.0.1.0
SQL> exit
Disconnected from Oracle Database 19c Enterprise Edition Release 19.0.0.0.0 - Production
Version 19.16.0.1.0
[oracle@linux-jump-server ~]$ sqlplus /@gfships_high
SQL*Plus: Release 21.0.0.0.0 - Production on Mon Aug 1 02:23:51 2022
Version 21.3.0.0.0
Copyright (c) 1982, 2021, Oracle. All rights reserved.
Last Successful login time: Mon Aug 01 2022 02:23:37 +00:00
Connected to:
Oracle Database 19c Enterprise Edition Release 19.0.0.0.0 - Production
Version 19.16.0.1.0
SQL> show user
USER is "ADMIN"
SQL> exit
Disconnected from Oracle Database 19c Enterprise Edition Release 19.0.0.0.0 - Production
Version 19.16.0.1.0
[oracle@linux-jump-server ~]$
SQLLDR Example:
[oracle@linux-jump-server ~]$ sqlldr admin/yourpassword@gfships_high control=emp.ctl
SQL*Loader: Release 21.0.0.0.0 - Production on Mon Aug 1 02:29:02 2022
Version 21.3.0.0.0
Copyright (c) 1982, 2021, Oracle and/or its affiliates. All rights reserved.
Path used: Conventional
Commit point reached - logical record count 6
Table EMPLOYEE:
6 Rows successfully loaded.
Check the log file:
emp.log
for more information about the load.
[oracle@linux-jump-server ~]$ sqlldr /@gfships_high control=emp.ctl
SQL*Loader: Release 21.0.0.0.0 - Production on Mon Aug 1 02:29:24 2022
Version 21.3.0.0.0
Copyright (c) 1982, 2021, Oracle and/or its affiliates. All rights reserved.
Path used: Conventional
Commit point reached - logical record count 6
Table EMPLOYEE:
6 Rows successfully loaded.
Check the log file:
emp.log
for more information about the load.
[oracle@linux-jump-server ~]$ cat emp.ctl
load data
infile '/home/oracle/emp.txt'
append into table employee
fields terminated by ","
( id, name, dept, salary )
[oracle@linux-jump-server ~]$
Thursday, June 2, 2022
Scaling OCPUs in Exadata Cloud
Three main ways you can scale the number of OCPUs in Exadata Cloud Service or Cloud at Customer:
- OCI Console
- REST api
- OCI Command Line Interface.
Here are four examples on how to script this scaling using either the REST api via Curl or the OCI CLI.
- "Auto Scaling" Script
- Curl
- OCI CLI
- dbaascli
Below you find details on each of the examples.
1. "Auto Scaling" Script
This script can be download from Oracle Support via Scale-up and Scale-down automation utility for OCI DB System (ExaCS/ExaCC) (Doc ID 2719916.1)
Oracle DynamicScaling utility can be executed as standalone executable or as daemon on one or more ExaCS compute nodes or ExaC@C vmcluster nodes. By default DynamicScaling is monitoring the CPUs with very limited host impact and if the load goes over the Maximum CPU threshold ("--maxthreshold") for an interval of time ("--interval"), it will automatically will scale-up the OCPU by a factor ("--ocpu") till a maximum limit ("--maxocpu"). If the load goes under the Minimum CPU threshold ("--minthreshold") for an interval of time ("--interval") scale down will be executed util the minimum limit ("--minocpu") of ocpu. If a valid cluster filesystem (ACFS) is provided, DynamicScaling will consider the load of all nodes (where DynamicScaling is running) and it will perform a scale-UP/DOWN based on the cluster node load (average/max). There are several examples in this doc.
2. Curl bash script
With using curl I find it easier to start with a "http get" method and make sure this works before moving on to using a "http put". This is a nice blog article on describing where to find each of these values. This is the api documentation for cloudVmClusters and UpdateCloudVmCluster.
Below is example "http get" script where you will need to change the tenancy_ocid, user_ocid, privateKeyPath, fingerprint, rest_api and host.
#!/bin/bash
########################## Fill these in with your values ##########################
#OCID of the tenancy calls are being made in to
tenancy_ocid="ocid1.tenancy.oc1..aaaaaaaactsgmdorji3bujtx6gbchuvbblbr3ddpqxxp5o3f2dxxxxxxxxxx"
# OCID of the user making the rest call
user_ocid="ocid1.user.oc1..aaaaaaaagt7makfurd57pdcwdtqh3l3yxbvymvwiei63ut3sqpxxxxxxxxxx"
# path to the private PEM format key for this user
privateKeyPath="/home/opc/greg.pem"
# fingerprint of the private key for this user
fingerprint="d2:7d:2e:22:3e:a8:8a:df:b7:d4:12:xx:xx:xx:xx:xx"
# The REST api you want to call, with any required paramters.
rest_api="/20160918/cloudVmClusters/ocid1.cloudvmcluster.oc1.phx.abyhqljrchvzy3scg4i5c4vykzrjszncnramcftjwymxkiaznixxxxxxxxxx"
# The host you want to make the call against
host="database.us-phoenix-1.oraclecloud.com"
####################################################################################
date=`date -u "+%a, %d %h %Y %H:%M:%S GMT"`
date_header="date: $date"
host_header="host: $host"
request_target="(request-target): get $rest_api"
# note the order of items. The order in the signing_string matches the order in the headers
signing_string="$request_target\n$date_header\n$host_header"
headers="(request-target) date host"
#echo "====================================================================================================="
printf '%b' "signing string is $signing_string \n"
signature=`printf '%b' "$signing_string" | openssl dgst -sha256 -sign $privateKeyPath | openssl enc -e -base64 | tr -d '\n'`
printf '%b' "Signed Request is \n$signature\n"
echo "====================================================================================================="
set -x
curl -v -X GET -sS https://$host$rest_api -H "date: $date" -H "Authorization: Signature version=\"1\",keyId=\"$tenancy_ocid/$user_ocid/$fingerprint\",algorithm=\"rsa-sha256\",headers=\"$headers\",signature=\"$signature\""
Here is a curl script example for a "HTTP PUT". This script changes the number of OCPUs (cores) at the VM cluster level.
#!/bin/bash
########################## Fill these in with your values ##########################
#OCID of the tenancy calls are being made in to
tenancy_ocid="ocid1.tenancy.oc1..aaaaaaaactsgmdorji3bujtx6gbchuvbblbr3ddpqxxp5o3f2dxxxxxxxxxx"
# OCID of the user making the rest call
user_ocid="ocid1.user.oc1..aaaaaaaagt7makfurd57pdcwdtqh3l3yxbvymvwiei63ut3sqpxxxxxxxxxx"
# path to the private PEM format key for this user
privateKeyPath="/home/opc/greg.pem"
# fingerprint of the private key for this user
fingerprint="d2:7d:2e:22:3e:a8:8a:df:b7:d4:12:xx:xx:xx:xx:xx"
# The REST api you want to call, with any required paramters.
rest_api="/20160918/cloudVmClusters/ocid1.cloudvmcluster.oc1.phx.abyhqljrchvzy3scg4i5c4vykzrjszncnramcftjwymxkiaznixxxxxxxxxx"
# The host you want to make the call against
host="database.us-phoenix-1.oraclecloud.com"
# the json file containing the data you want to POST to the rest endpoint
body="./request.json"
####################################################################################
# extra headers required for a POST/PUT request
body_arg=(--data-binary @${body})
content_sha256="$(openssl dgst -binary -sha256 < $body | openssl enc -e -base64)";
content_sha256_header="x-content-sha256: $content_sha256"
content_length="$(wc -c < $body | xargs)";
content_length_header="content-length: $content_length"
headers="(request-target) date host"
# add on the extra fields required for a POST/PUT
headers=$headers" x-content-sha256 content-type content-length"
content_type_header="content-type: application/json";
date=`date -u "+%a, %d %h %Y %H:%M:%S GMT"`
date_header="date: $date"
host_header="host: $host"
request_target="(request-target): put $rest_api"
# note the order of items. The order in the signing_string matches the order in the headers, including the extra POST fields
signing_string="$request_target\n$date_header\n$host_header"
# add on the extra fields required for a POST/PUT
signing_string="$signing_string\n$content_sha256_header\n$content_type_header\n$content_length_header"
echo "====================================================================================================="
printf '%b' "signing string is $signing_string \n"
signature=`printf '%b' "$signing_string" | openssl dgst -sha256 -sign $privateKeyPath | openssl enc -e -base64 | tr -d '\n'`
printf '%b' "Signed Request is \n$signature\n"
echo "====================================================================================================="
set -x
curl -v --data-binary "@./request.json" -X PUT -sS https://$host$rest_api -H "date: $date" -H "x-content-sha256: $content_sha256" -H "content-type: applica tion/json" -H "content-length: $content_length" -H "Authorization: Signature version=\"1\",keyId=\"$tenancy_ocid/$user_ocid/$fingerprint\",algorithm=\"rsa- sha256\",headers=\"$headers\",signature=\"$signature\""
This is the file request.json:
{
"cpuCoreCount" : 6
}
"cpuCoreCount" : 6
}
3. OCI Command Line Interface (OCI CLI)
This is a good blog article on setting this up, here are the basic steps:
- Install OCI CLI or use the cloud shell which has the cli already installed
- Setup instance principal — instead of using an instance principal you may need to use a userid and token
- Create the script — here is the oci cli command reference manual for cloud-vm-cluster update
This is the example script:
#!/bin/bash
export OCI_CLI_AUTH=instance_principal
oci db cloud-vm-cluster update --cloud-vm-cluster-id ocid1.cloudvmcluster.oc1.phx.abyhqljrchvzy3scg4i5c4vykzrjszncnramcftjwymxkiaznis5xxxxxxxx --cpu-core-count 6 --auth instance_principal
You will need to modify the vm cluster ocid. This script changes the vm cluster to 6 OCPUs(cores).
4. dbaascli
On ExaCC only, you can change the OCPUs(cores) with dbaascli. Login into one of the compute nodes within the VM Cluster you would like to modify and issue the command below. Here is the documentation.
dbaascli cpuScale update --coreCount 3
This will change each node within the cluster to 3 OCPUs(cores).
Tuesday, May 31, 2022
Migrating SQL Server to Oracle Cloud database offline
This blog covers the basic steps in migrating a SQL Server 2016 database to Autonomous Database 19c via SQL Developer migration tool offline.
What I used:
Basic steps all within SQL Developer:
- SQL Server 2016 running on a Windows server in OCI as the source in online mode
- Autonomous Database on Shared infrastructure as the target in offline mode
- SQL Developer 21.4.3 running on the same server as SQL Server
- SQL Developer documentation
- create connection to the source (SQL Server 2016)
- Setup migration repository, I used a different schema within the target Autonomous Database
- capture source information online
- review convert/translate options for meta info, procedures, triggers, views, ...
- select offline mode for DDL and data
- run the job
- after job is completed run the DDL, extract data from source and load the data to the target
Almost always you will use offline in which SQL Developer creates the scripts which you will use to move a production database. Online is nice for testing.
After creating connections within SQL Developer to the source and target as well as setting up the migration repository select Tools->Migration->Migrate.
 |
| Step 1 -- Overview of migration steps |
 |
| Step 2 -- Select migration repository |
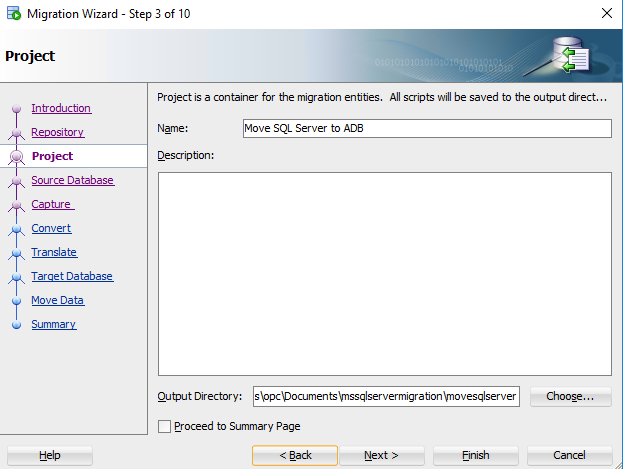 |
| Step 3 -- Create project, note that this is where the scripts and data will be stored so make sure you have enough storage as well as where to place the files perhaps on a NFS mount that both could access. |
 |
| Step 4: Select Source in online mode |
 |
| Step 5: Select Database(s) |
 |
| Step 6: Review data type convert options |
 |
| Step 7: Select Objects to migrate, default is all |
 |
| Step 8: Select offline to move DDL |
 |
| Step 9: Select data to be moved offline |
 |
| Step 10: Summary and Start job to migrate |
After the job is completed successfully you will want to run the scripts to create the DDL and copy the data to the target database.
 |
| In the project directory you will find the DDL and data scripts |
 |
| Run the master.sql script on the target which creates the DDL |
 |
| These are the scripts to extract and load the data |
| command parameters are IP address of source database, userid and password to connect to source. This command exports the data from source database to files |
command parameters are connect string , user and password
to the target database. This commands loads the data from
the files to the target database.
Migrating SQL Server to Oracle Cloud database online
This blog covers the basic steps in migrating a SQL Server 2016 database to Autonomous Database 19c via SQL Developer online migration tool.
What I used:
Basic steps all within SQL Developer:
- SQL Server 2016 running on a Windows server in OCI as the source
- Autonomous Database on Shared infrastructure as the target
- SQL Developer 21.4.3 running on the same server as SQL Server
- SQL Developer documentation
- create connections to the source (SQL Server 2016) and target (Autonomous Database)
- Setup migration repository, I used a different schema within the target Autonomous Database
- capture source information
- review convert/translate options for meta info, procedures, triggers, views, ...
- create target
- submit the job to create the DDL and move the data
Almost always you will use offline in which SQL Developer creates the scripts which you will use to move a production database. Online is nice for testing.
After creating connections within SQL Developer to the source and target as well as setting up the migration repository select Tools->Migration->Migrate.
 |
| Step 1 -- Info on steps |
 |
| Step 2 -- Select repository |
 |
| Step 4 -- Select source |
 |
| Step 5 -- Select database(s) |
 |
| Step 6 -- Convert data types |
 |
| Step 7 -- Select objects to be converted |
 |
| Step 8 -- Select target |
 |
| Step 9 -- Select move data online |
 |
| Step 10 -- Start job to migrate |


Subscribe to:
Posts (Atom)